Pickleball Courts: Simple DIY Solutions for At-Home Play
How to Build a Pickleball Court at Home
If you're an avid pickleball player and want to take your game to the next level, why not consider building a pickleball court in your own backyard? It is the perfect way to keep yourself active and entertained while having fun with friends or family. Building a pickleball court at home is convenient, but costs and effort vary widely depending on the surface, drainage and permits needed. A simple taped or painted court on an existing hard surface is the easiest start.
If you're considering building a pickleball court at home, here are the steps you can follow to make it a reality:
Choose a suitable location
The ideal location for a pickleball court is a flat, hard surface such as concrete or asphalt (or an existing tennis court or driveway) that is free from obstacles such as trees and poles. A pickleball court is 20 feet wide by 44 feet long for both singles and doubles, and USA Pickleball recommends a total playing area of at least 30 by 60 feet. Keep in mind that the court should be located in a well-draining area to prevent standing water and should have enough space around it to allow for proper play. Grass is not suitable because the ball will not bounce reliably.
Mark out the court
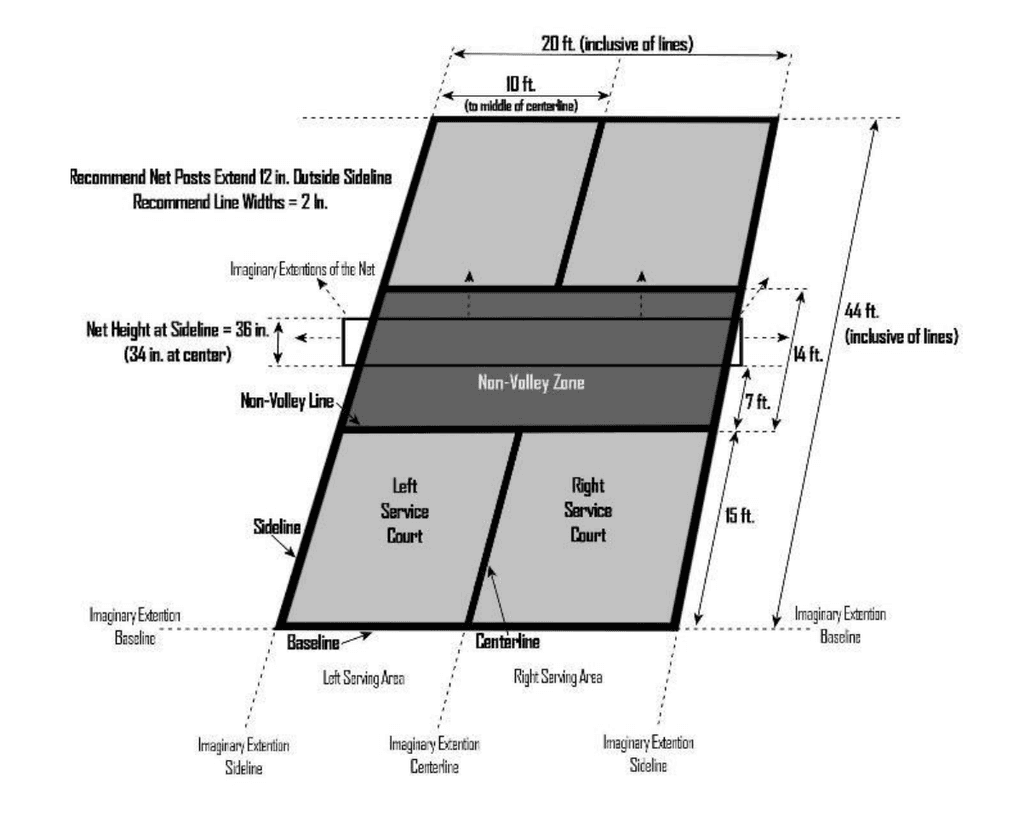
Once you have identified a suitable location for your pickleball court, it's time to mark out the dimensions of the court. This can be done using stakes and string or by spraying paint on the ground. Be sure to mark out the centerline, service lines, and non-volley zone (also known as the "kitchen"). You can find detailed diagrams and measurements for a pickleball court online or in the USA Pickleball Equipment Standards Manual.
Here is a list of the official court dimensions if you want to be exact
- The court shall be a rectangle measuring 20 feet (6.10 m) wide and 44 feet (13.41 m) long for both singles and doubles matches.
- Court measurements shall be made to the outside of the perimeter and non-volley zone lines. All lines should be 2 inches (5.08 cm) wide and the same color, clearly contrasting with the color of the playing surface.
- The minimum playing surface area measures 30 feet (9.14 m) wide and 60 feet (18.29 m) long. A larger recommended area, often cited for tournament-style play, is 34 feet by 64 feet or more.
Prepare the surface
After you have marked out the court, you'll need to prepare the surface for play. This may involve clearing the area of debris, leveling the ground, and adding a base layer of material such as sand or gravel. The base layer should be compacted and smooth to provide a stable and consistent playing surface. For a more permanent court, the usual surfaces are concrete or asphalt with an acrylic playing-surface coating, or a sport tile system; check local permits and consult a contractor.
Install the net
Pickleball nets are mesh nets that are 34 inches high at the center and 36 inches high at the posts. You can buy a portable net system, or build a frame from PVC or metal if you are handy. Make sure to anchor the net securely to the ground to prevent it from moving during play. You can also add posts or other support structures to keep the net upright and stable.
Here are a list of Net specifications from the Official Pickleball Handbook
- Material. The net may be made of any mesh fabric material that will not allow a ball to pass through it.
- Posts. Net posts should be 22 feet +/- 0.0 Inches (6.71 m) from the inside of one post to the inside of the other post. The maximum diameter of the net post should be 3 inches (7.62 cm).
- The net length should be at least 21 feet 9 inches (6.63 m) extending from one post to the other. The net should be at least 30 inches tall from its bottom edge to the top.
- Edge. The top of the net should be edged with a 2- inch (5.08-cm) white tape binding over a cord or cable running through the binding. This binding must rest upon the cord or cable.
- Center Strap and Height. A center strap is recommended for permanent net and must be placed at the center of the net to enable easy adjustment to the 34-inch (86.36-cm) requirement at center. The top shall be 36 inches (91.44 cm) high at the sidelines.
Of course, these are just the official specifications, and for a home court, you do not need to be so exact.
Add lines and other features
Once the net is in place, you can use paint or specialized court marking tape to add lines and other features to your court. This may include the centerline, service lines, and non-volley zone. You can also add additional features such as backboards or windscreens if desired. These features can help make your court easier to play on and improve the user experience as a whole.
Here are a list of line specifications
- Baselines. The lines parallel to the net at each end of the court.
- Sidelines. The lines perpendicular to the net on each side of the court.
- Non-Volley Zone (NVZ). The area of the court, specific to each team, on either side of the net bounded by a line between the two sidelines (nonvolley zone line) parallel to and 7 feet (2.13 m) from the net. All NVZ lines are part of the NVZ.
- Service Court. The area beyond the NVZ on either side of the centerline, including the centerline, sideline, and baseline.
- Centerline. The line down the center of the court on either side of the net extending from the NVZ to the baseline separating the odd and even service courts.
- Right/Even Court. The service area on the right side of the court when facing the net.
- Left/Odd Court. The service area on the left side of the court when facing the net.
Test the court
After you have finished building your pickleball court, it's important to test it out and make any necessary adjustments. This may involve fine-tuning the surface or net height, or adding additional features such as windscreens or backboards. You may also want to invite friends or other players to test out the court and provide feedback.
If you follow these steps, you should be able to set up a court you can use at home to play and practice. For a permanent court, plan for drainage, permits and a professional contractor.